
Implementing OAuth 2.0 Authentication for Parqet Connect
Want to build an app that accesses your users' Parqet portfolio data? This tutorial walks you through implementing OAuth 2.0 authentication — the secure and convinient way for users to grant your integration access to their portfolios.
What We're Building
By the end of this tutorial, you'll have a working integration that:
- Redirects users to Parqet to authorize access
- Handles the OAuth callback and exchanges the authorization code for tokens
- Uses access tokens to fetch portfolio data from the Parqet Connect API
We'll build a simple Node.js server that demonstrates the complete flow. You can adapt this to any framework or language.
OAuth 2.0 Flow Overview
OAuth 2.0 with PKCE lets users securely grant your app access to their Parqet portfolios. Your app redirects users to Parqet, they approve access, and you receive tokens to call the API on their behalf.
User                    Your App                        Parqet
  │                         │                              │
  │ Clicks                  │                              │
  │ "Connect with Parqet"   │                              │
  │────────────────────────▶│                              │
  │                         │───── Redirect ──────────────▶│
  │                         │                              │
  │◀──────────────────────── Login & Consent ──────────────│
  │───────────────────────── Approve ─────────────────────▶│
  │                         │                              │
  │                         │◀──── Callback + Code ────────│
  │                         │───── Exchange Code ─────────▶│
  │                         │◀──── Access Token ───────────│
  │                         │                              │
           ─ ─ ─ ─ ─ ─  Authorization Complete  ─ ─ ─ ─ ─ ─
  │                         │                              │
  │                         │───── GET /user ─────────────▶│  (example)
  │                         │◀──── User Info ──────────────│
Step-by-step breakdown
- User initiates — The user clicks a "Connect with Parqet" button in your app to start the flow
- Redirect to Parqet — Your app generates a secure authorization URL with PKCE parameters and redirects the user to Parqet's authorization server
- User authenticates — The user logs in to their Parqet account (if not already) and reviews the permissions your app is requesting
- User approves — The user selects which portfolios to share and approves access
- Callback with code — Parqet redirects back to your app's callback URL with a short-lived authorization code
- Exchange for tokens — Your server sends the authorization code to Parqet's token endpoint and receives an access token and refresh token
- Access the API — Use the access token in API requests to fetch the user's portfolio data
Prerequisites
Before starting, ensure you have:
- A registered integration in the Parqet Connect Developer Hub
- Your Client ID from the integration settings
- A configured redirect URI (e.g.,
http://localhost:1337/callbackfor local development) - Node.js 18+ installed
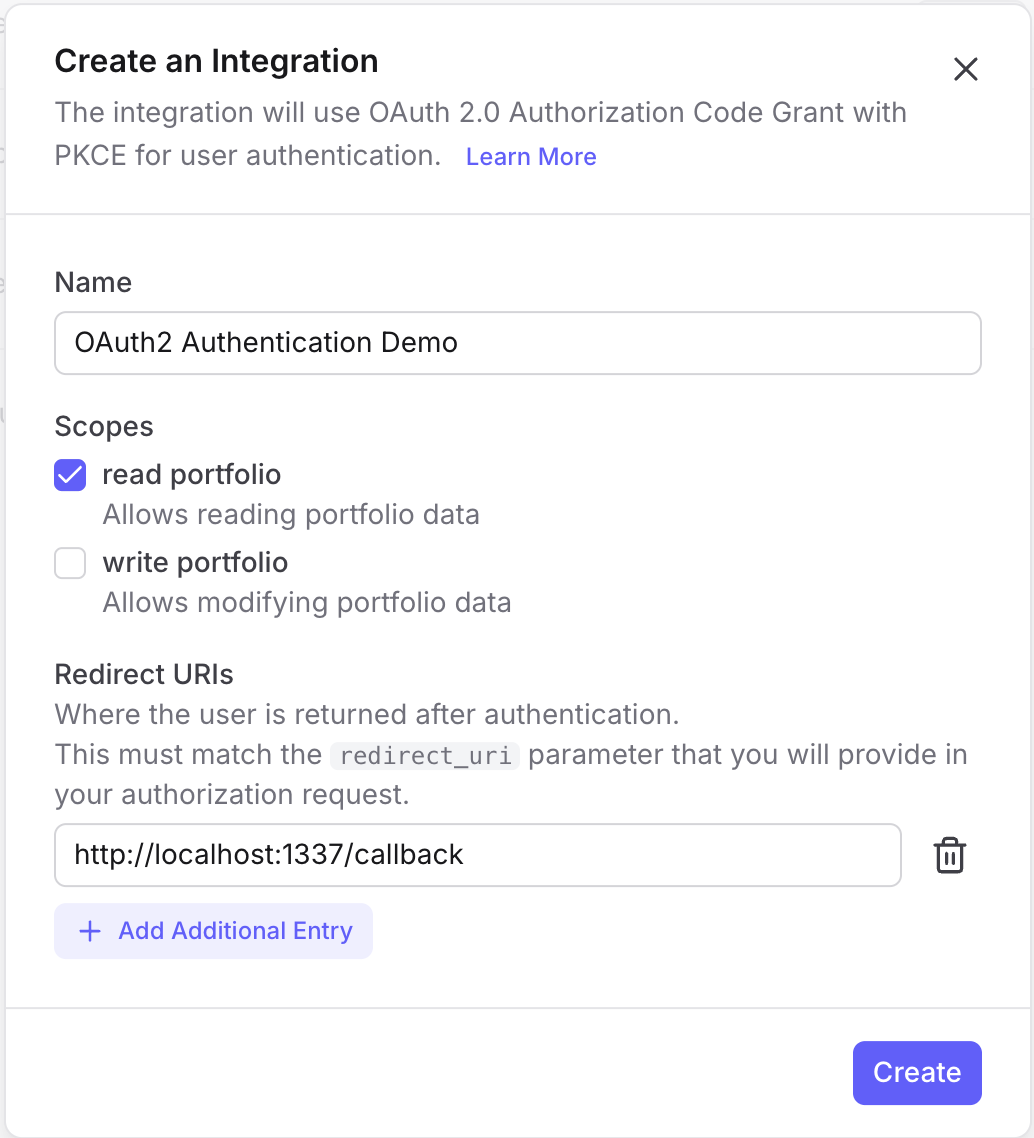
When creating your integration, make sure to add http://localhost:1337/callback as a redirect URI for local development:
Setting Up Your Integration
We'll use the openid-client library, which provides a robust OAuth 2.0 client implementation:
npm install openid-client
First, configure your OAuth client:
import * as client from "openid-client";

const issuer = "https://connect.parqet.com";
const clientId = "01234567-89ab-7000-8000-000000000000"; // From Developer Hub
const redirectUri = "http://localhost:1337/callback";

// Configure the OAuth client
const config = new client.Configuration(
  {
    issuer,
    authorization_endpoint: `${issuer}/oauth2/authorize`,
    token_endpoint: `${issuer}/oauth2/token`,
  },
  clientId,
);

// Allow HTTP redirect URIs (required for local development)
// ⚠️ Never use this in production — always use HTTPS!
client.allowInsecureRequests(config);
The Complete OAuth Flow
Step 1: Generate the Authorization URL
The first step is generating a secure authorization URL with PKCE parameters:
// Store code verifiers by state for the callback.
// ℹ️ In-memory storage is for demonstration only!
// In production, use a database, Redis, or encrypted cookies
// to persist state across server restarts and multiple instances.
const dataStore = new Map<string, { codeVerifier: string }>();

async function generateAuthorizationUrl() {
  // Generate PKCE code verifier and challenge
  const codeVerifier = client.randomPKCECodeVerifier();
  const codeChallenge = await client.calculatePKCECodeChallenge(codeVerifier);

  // Generate random state for CSRF protection
  const state = client.randomState();

  // Store the code verifier - we'll need it when exchanging the code
  dataStore.set(state, { codeVerifier });

  // Build the authorization URL
  return client.buildAuthorizationUrl(config, {
    redirect_uri: redirectUri,
    scope: "portfolio:read", // or "portfolio:write" for write access
    code_challenge: codeChallenge,
    code_challenge_method: "S256",
    state,
  });
}
The generated URL will look like:
https://connect.parqet.com/oauth2/authorize?
  client_id=01234567-89ab-7000-8000-000000000000&
  redirect_uri=http://localhost:1337/callback&
  response_type=code&
  scope=portfolio:read&
  code_challenge=E9Melhoa2OwvFrEMTJguCHaoeK1t8URWbuGJSstw-cM&
  code_challenge_method=S256&
  state=abc123
Step 2: Redirect the User
When a user wants to connect their Parqet account, redirect them to the authorization URL:
app.get("/", async (request, reply) => {
  const url = await generateAuthorizationUrl();
  return reply.redirect(url.toString());
});
The user will see a Parqet consent screen where they can:
- Log in to their Parqet account (if not already logged in)
- Select which portfolios to share with your integration
- Review and approve the requested permissions
Step 3: Handle the OAuth Callback
After the user approves (or denies) access, Parqet redirects back to your callback URL with an authorization code:
app.get("/callback", async (request, reply) => {
  const { state, code, error } = request.query;

  // Handle user denial or errors
  if (error) {
    return reply.status(400).send({
      error: "Authorization failed",
      description: error,
    });
  }

  // Retrieve the stored code verifier
  const data = dataStore.get(state);
  if (!data) {
    return reply.status(400).send({
      error: "Invalid state",
      description: "State parameter does not match.",
    });
  }

  // Exchange the authorization code for tokens
  const tokens = await client.authorizationCodeGrant(config, new URL(request.url, redirectUri), {
    pkceCodeVerifier: data.codeVerifier,
    expectedState: state,
  });

  // Clean up the stored state
  dataStore.delete(state);

  // Store tokens securely (database, encrypted storage, etc.)
  console.log("Access Token:", tokens.access_token);
  console.log("Refresh Token:", tokens.refresh_token);

  return reply.send({ success: true });
});
Step 4: Use the Access Token
With the access token, you can now make authenticated requests to the Parqet Connect API:
async function fetchUserInfo(accessToken: string) {
  const response = await client.fetchProtectedResource(config, accessToken, new URL("/user", issuer), "GET");

  return response.json();
}

async function fetchPortfolios(accessToken: string) {
  const response = await client.fetchProtectedResource(config, accessToken, new URL("/portfolios", issuer), "GET");

  return response.json();
}
Complete Example: Fastify Integration Server
Here's a complete working example using Fastify:
import Fastify from "fastify";
import * as client from "openid-client";

const issuer = "https://connect.parqet.com";
const clientId = "01234567-89ab-7000-8000-000000000000"; // From Developer Hub
const redirectHost = "http://localhost:1337";

const config = new client.Configuration(
  {
    issuer,
    authorization_endpoint: `${issuer}/oauth2/authorize`,
    token_endpoint: `${issuer}/oauth2/token`,
  },
  clientId,
);

// Allow HTTP redirect URIs (required for local development)
// ⚠️ Never use this in production — always use HTTPS!
client.allowInsecureRequests(config);

const dataStore = new Map<string, { codeVerifier: string }>();

async function generateAuthorizationUrl() {
  const codeVerifier = client.randomPKCECodeVerifier();
  const codeChallenge = await client.calculatePKCECodeChallenge(codeVerifier);
  const state = client.randomState();

  dataStore.set(state, { codeVerifier });

  return client.buildAuthorizationUrl(config, {
    redirect_uri: `${redirectHost}/callback`,
    scope: "portfolio:read",
    code_challenge: codeChallenge,
    code_challenge_method: "S256",
    state,
  });
}

const fastify = Fastify({ logger: true });

// Start the OAuth flow
fastify.get("/", async (request, reply) => {
  const url = await generateAuthorizationUrl();
  return reply.redirect(url.toString());
});

// Handle the OAuth callback
fastify.get("/callback", async (request, reply) => {
  const { state } = request.query as { state: string };
  const data = dataStore.get(state);

  if (!data) {
    return reply.status(400).send({ error: "Invalid state" });
  }

  // Exchange code for tokens
  const tokens = await client.authorizationCodeGrant(config, new URL(request.url, redirectHost), {
    pkceCodeVerifier: data.codeVerifier,
    expectedState: state,
  });

  dataStore.delete(state);

  // Fetch user info to verify access
  const userResponse = await client.fetchProtectedResource(
    config,
    tokens.access_token,
    new URL("/user", issuer),
    "GET",
  );

  const userInfo = await userResponse.json();

  return reply.send({
    message: "Authentication successful!",
    user: userInfo,
  });
});

fastify.listen({ port: 1337 }, (err) => {
  if (err) throw err;
  console.log("Server running at http://localhost:1337");
  console.log("Visit http://localhost:1337 to start the OAuth flow");
});
Understanding Scopes
Parqet Connect uses scopes to control what your integration can access:
| Scope | Description |
|---|---|
portfolio:read | Read access to portfolio data, holdings, and performance |
portfolio:write | Write access to create portfolios and activities |
Request only the scopes your integration needs. Users see these permissions during the consent flow and are more likely to approve minimal access requests.
Common Issues and Solutions
"Invalid redirect_uri"
Ensure the redirect URI in your code exactly matches what's configured in the Developer Hub, including trailing slashes.
"Invalid state"
This usually means:
- The state was lost between the authorization request and callback (e.g., server restart)
- Multiple browser tabs causing state conflicts
- Session storage issues
Next Steps
Now that you have authentication working:
- API Reference - Explore available endpoints
Have questions? Check out our API documentation or reach out to our developer support team.